vRealize Network Insight
- markjramos
- Jul 11, 2022
- 7 min read
Updated: Mar 18, 2023

VMware vRealize Network Insight is a solution provided by VMware to deliver intelligent operations for software defined networking and security and customers can build an optimized, highly-available and secure network infrastructure across multi-cloud environments. It extends the visibility across the virtual and physical networks and provide operational views to manage and scale VMware NSX deployments in a virtualized environment.
VRNI is a tool to collect and analyze the traffic between the applications and within the applications. It classifies the virtual environment based on the applications and each application to tiers. And the classifications in the VRNI to classify the vms is using roles either with matching the virtual machine name with suffix or by folders or tags, … in the application discovery.
Dashboard Sections
vRealize Network Insight contains a navigation panel on the left that helps users to navigate quickly to the key product features such as Plan & Assess, Intent, Topologies, Entities, Alerts, and Saved Searches of interest without having to type any search queries.
Plan Section
- Micro Segments: You can plan the micro-segmentation of the network based on the
flows between all the VMs.
- Application: You can define your applications and analyse their flows, and plan their security.
Operate and Troubleshoot Section
The Operate and Troubleshoot section provides visibility, metrics, and analytics for the following components:
Virtual Machine (VM)
VLAN Network
Data Center
NSX Security Group
VMware NSX
vRealize Network Insight Deployment Architecture

The vRealize Network Insight architecture consists of a platform VM, a proxy VM, and data sources. The role of the platform VM within the architecture is to perform analytics, storage, and to provide a user interface into the data. The proxy VM, or the collector, collects data from sources using various protocols such as IPFIX, HTTPS, SSH, CLI, and SNMP, depending on the source and the configuration. A variety of data sources are supported, including VMware vCenter, NSX, firewalls, various switch vendors, and various cloud environments (VMC, AWS, and Azure).
360 Degree Visibility
The vRealize Network Insight relies on the use of an IPFIX collector at the Virtual Distributed switch layer to capture data flows. IPFIX is enabled at the Virtual Distributed switch layer for the ESXi Hosts to forward IPFIX UDP packets to the vRealize Network Insight appliance. The data capture will enable real time data flow for all port traffic and provide further filtering capabilities in order to have full traffic visibility.

Within hours of collecting data, a visual representation of traffic is shown to understand the logical relationship between each component, physical or virtual in order to track flows and sessions within a network. A 360 view of logical and physical components in the DC provides complete correlation between overlay and underlay and helps identify any potential issues.
Preparing for Installation
System Recommendations and Requirements for the vRealize Network Insight. Before installing the vSphere Network Insight, prepare the deployment environment to meet the system requirements.
Supported Products and Versions. vRealize Network Insight supports several products as Data sources. Data sources provide the application the ability to gather data from certain aspects of your data center. These range from your NSX installation to other physical devices.
VMware Product Interoperability Matrices. Provides details about the compatibility of current and earlier versions of VMware vSphere components, including ESXi, vCenter Server, and other VMware products.
VSphere Hardware and Guest Operating System Compatibility Guides. An online reference that shows what hardware, converged systems, operating systems, third-party applications, and VMware products are compatible with a specific version of a VMware software product.
VMware Configuration Maximums. When you configure, deploy, and operate your virtual and physical equipment, you must stay at or below the maximums supported by your product. The limits presented in the Configuration Maximums tool are tested limits supported by VMware.
Downloading vRealize Network Insight OVA Files
Download the vRealize Network Insight OVA files from the VMware Downloads Web Site. VMware vRealize Network Insight is listed under Infrastructure and Operations Management. You will need to download two OVA files: the vRealize NI Platform OVA and the vRealize NI Proxy (or Collector) OVA.
Installing vRealize Network Insight
To deploy vRealize Network Insight, you install the vRealize NI Platform OVA, activate the license, generate a shared secret, and then setup the vRealize NI Proxy (Collector) OVA.
Installing vRealize Network Insight Platform OVA
You can set up the Network Insight Platform by importing OVA to your vCenter server. Right-click the target host on which you want to deploy the platform appliance and select Deploy OVF Template.

Browse to select the source location of the OVA package.

Enter the OVA name. Select the destination folder for deployment.

Select a host or a cluster or a resource pool where you want to run the deployed template.

Verify the OVF template details.

Read the End User License Agreement and click Accept.

Select a deployment configuration. Click Next.

Select the location to store the files for the deployed template. Select the Virtual Disk format. Select the datastore or the datastore clusters where you want to store the files. Click Next.

Select the network that the deployed VM will use. The selected network should allow the appliance to reach out to Internet for support and upgrade.

To customize the template for the deployment, you will have to manually configure the appliance using the VM console. Click Next.

Verify the configuration details and click Finish to start the platform appliance creation.

Once the platform is installed, start the virtual machine and launch the console.
Log in with the console credential that you see on the screen and run the setup command.

Create the password for the support login and change the password for the consoleuser.

Enter the network configuration details. For multiple DNS servers, ensure that they are separated by space.

Enter the NTP Sever and ensure that it can reached from the virtual appliance. The services will fail to start if NTP time is out of sync. For multiple NTP servers, ensure that they are separated by commas.

(Optional) To configure Web Proxy, enter n.
All the services are verified.

You have installed the vRealize Network Insight Platform OVA.
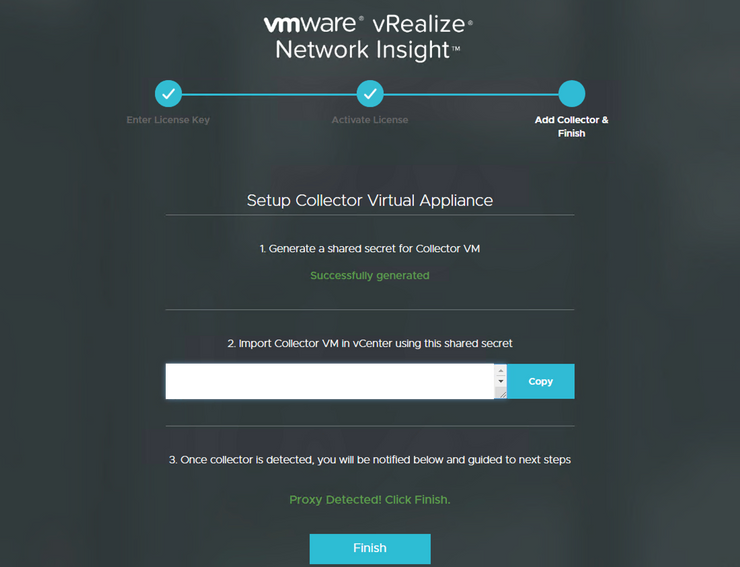
Activating the License and Generating a Shared Key
After installing the vRealize Network Insight Platform OVA, browse to the vRealize Network Insight Platform IP address. Enter the License key and click Validate.

For UI admin (admin@local) user name, set the password and click Activate.

To generate a shared secret key required for setting up the Collector Virtual Appliance, click Generate.

Copy the shared secret. You will require this during the deployment of the Network Insight Collector OVA.

Setting up Network Insight Collector (OVA)
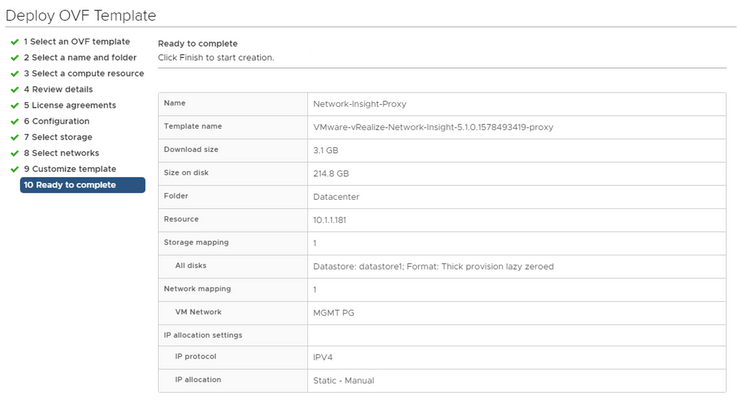
You can set up the Network Insight collector by importing OVA to your vCenter server. Right-click the target host on which you want to deploy the collector appliance and select Deploy OVF Template.

Browse to select the source location of the OVA package.

Enter the OVA name. Select the destination folder for deployment.

Select a host or a cluster or a resource pool where you want to run the deployed template.

Verify the OVF template details.

Read the End User License Agreement and click Accept.

Select a deployment configuration. Click Next.

Select the location to store the files for the deployed template. Select the Virtual Disk format. Select the datastore or the datastore clusters where you want to store the files. Click Next.

Select the network that the deployed virtual appliance will use. The selected network should allow the appliance to reach out to Internet for support and upgrade.

Customize the template for the deployment. Provide the shared secret that was generated from the UI. You will have to manually configure the appliance using the web console. Click Next.

Verify the configuration details and click Finish to start the collector appliance creation.
Once the collector is installed, start the virtual machine and launch the console.
Log in with the console credential that you see on the screen and run the setup command.

Create the password for the support login and change the password for the consoleuser.

Enter the network configuration details. For multiple DNS servers, ensure that they are separated by space.

Enter the NTP Sever and ensure that it can reached from the virtual machine. The services will fail to start if NTP time is out of sync. For multiple NTP servers, ensure that they are separated by commas.
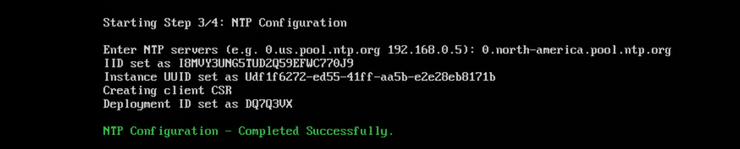
(Optional) To configure Web Proxy, enter n.
A check is made to see if the shared secret key has been configured. The collector is paired with the corresponding platform. This may take few minutes.

All services are verified.

You have installed the vRealize Network Insight Collector OVA.
Return back to the UI. Click Finish, once Proxy Detected! message is displayed on the onboarding page. It will redirect to the Login Page.
you are now redirected to the Login page. Enter the admin (admin@local) user name and the administrative password.

Adding vCenter Server as a Data Source in vRealize Network Insight
Data sources provide the application the ability to gather data from certain aspects of your data center. You can add vCenter Servers as data source to vRealize Network Insight. Multiple vCenter Servers can be added to vRealize Network Insight to start monitoring data.
To add vCenter Server as a Data Source in vRealize Network Insight, click VMware vCenter.

Customize the following options, then click Validate:
Select a collector virtual appliance from the drop-down menu. Enter the IP address or fully qualified domain name of the vCenter Server. Enter the user name and password for vRealize Network Insight software to access the vCenter Server system.
Note - The user name with the following privileges:
Distributed Switch: Modify
dvPort group: Modify

Select Enable Netflow (IPFIX) on this vCenter, to enbale IPFIX. Enter a Nickname for the Data Source and click Submit.

If the number of virtual machines discovered exceeds the capacity of the platform or a collector node or both, the validation fails. You will not be allowed to add a data source until you increase the brick size of the platform or create a cluster.
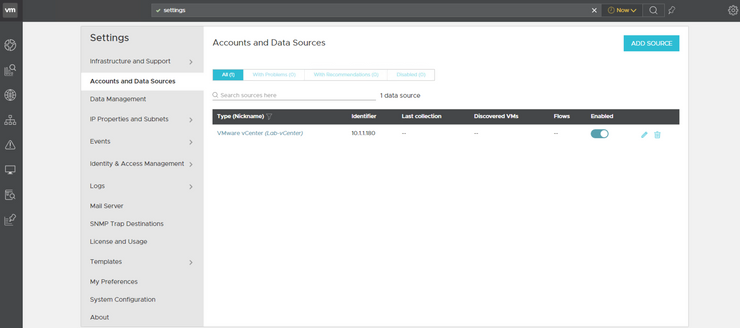
You successfully added a vCenter server account. The vCenter server appears as a Data Source in the vRealize Network Insight Inventory.
Understanding IP Properties and Subnets Categorization
By default, RFC1918 (private) addresses are categorized as Internal or E/W. Non-RFC1918 (public) addresses are categorized as External or N/S. You can flag private as N/S or public as E/W to ensure the reports reflect your environment. In vRealize Network Insight, you can configure different IP properties for better security planing and identification.

Comments